Showing posts with label upcycled. Show all posts

Saturday, April 28, 2012

Pencil Crate Teacher Appreciation Gift

This week was Teacher Appreciation week at Samantha's school, and believe me, I APPRECIATE her teacher. Samantha is in Kindergarten and I think Kindergarten teachers are some of the most important teachers a child will have. They introduce a child to school and can influence that child's attitude about education and learning forever. Samantha has an amazing teacher who has really helped her blossom this year and gain an enthusiasm for school. Thank you Mrs. Melzer!

For Teacher Appreciation Week the school sent home lists of items each teacher had requested. Mrs. Melzer asked for washable markers, Smarties, Ziploc baggies, and stickers. Being me, I couldn't just put these items into a gift bag like a normal person. With a little Pinspiration I came up with my own fun little container. Here it is:

I found a mini milk crate at Target and hot glued pencils around the edges.

This is the Pinspiration


Teacher loot. I love how twine can make anything look charming!


Who doesn't love an apple cozy? They are about as practical as barefoot sandals, but oh-so cute!


There you have it. An adorable gift for an amazing teacher.

Happy Crafting!
~Macy

Getting my linky fix with:


 UndertheTableandDreaming


Funky Junk's Sat Nite Special

Friday, April 27, 2012

Candlestick Pincushions

What do you get when you cross Sudafed with a hot glue gun? The wacky idea to turn candlesticks into pincushions!


I have been battling a nasty head cold this week, but after a big ole' dose of cold medicine cocktail, I was feeling well enough to get my craft on.

I have had a couple of dollar store candlesticks sitting on my craft cupboard since Valentine's day. I occasionally drop a loose button into the top of one, but for the most part they have become dust collectors. The other day I had a few straight pins lying around just waiting to roll onto the floor and stab someone. I dropped them into the top of the candlestick and the idea for my candlestick pincushions was born. 

Materials:
candlesticks
scrap fabric
a handful of stuffing--the polyester kind, not the kind you stuff in the turkey. :P
hot glue gun and glue
tiny rubber band

Cut your fabric into a circle. Mine was around 9 inches.
Wrap the fabric around the stuffing and tie off the end with a rubber band.


Make sure you have your cushion the shape/size you want and cut off the excess fabric.
Hot glue the inside rim of the candlestick and carefully place the cushion into the stick.


Fluff and squish and add your pins.


Voila! In less than 10 minutes you have a new pincusion (or two). 
What household things have YOU turned into pincushions?

Happy Crafting!
~Macy

Featured on:


Linking up to:

Tip Junkie handmade projects


 UndertheTableandDreaming


Funky Junk's Saturday Nite Special


Thursday, April 12, 2012

10 Ways to Reuse Plastic Easter Eggs

If you are like me then you are up to your ears in little plastic Easter Eggs! I bought four packages on the outside chance that we couldn't make it to an egg hunt. On top of those four packages my three children collected a ton of eggs at the hunt we went to. I'm planning on saving some for next year, but I upcycled quite a few eggs. Here is what I did along with a few other ideas:

1. Button storage. To make it easier on yourself glue one of the buttons to the outside of the egg so you won't have to open each egg looking for the correct color.


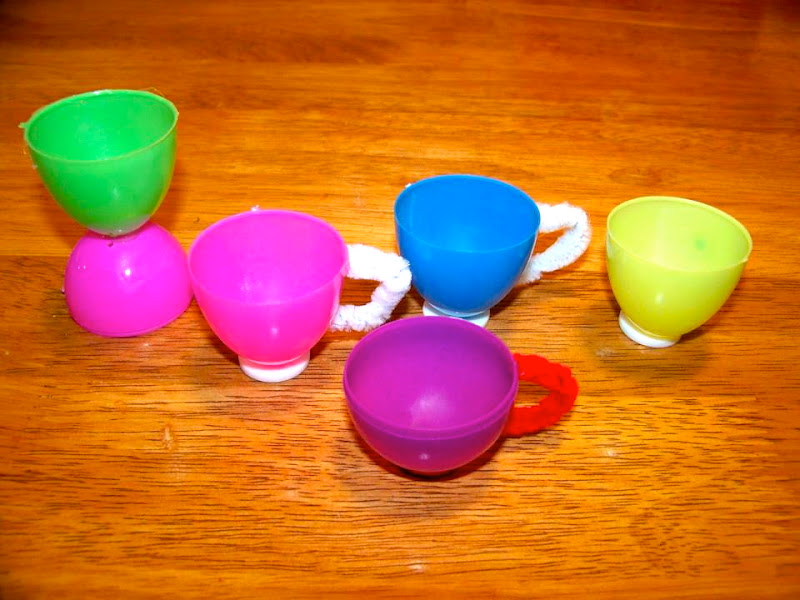
2. Tea cups. Seriously! Just hot glue anything round like a button, poker chip, or penny to the bottom of the egg. Double up a pipe cleaner, bend into the shape of handle, and glue it to the side. Voila! A teacup! You can also glue the bottom part of the egg to the top to make a mini-goblet. If you plan on putting anything into these cups make sure you dab some hot glue over the little holes.


3. Snack container. These are perfect for bunny grahams or Cheerios. Just stick them in your purse and you are good to go.


4. Teaching tools. Write the uppercase letters of the alphabet on the top halves of the eggs and the lower case letters on the bottom halves. Mix them up and let your little one match the letters. I also did this with math problems.


5. Play dough containers. Use the eggs to store homemade play dough, or even clay. Just make sure you cover the holes so no air gets in.

This is black Halloween dough and yes...it looks disgusting!

6. Paint containers. Cover the holes with hot glue and glue the eggs to one another as shown. This is perfect for painting projects. I used mine to hold home-made sidewalk paint.


Here are a few other ways to use your eggs:

7. Seed starter. Because most plastic eggs have little holes at the bottom they make perfect seed starters.

8. Seed packets. You can use your eggs to simply hold your seeds until you are ready for them.

9. Organize office supplies like paper clips, push pins, etc...

10. Store little game pieces like BINGO chips.

I hope this helps you cut down on your every-growing supply of plastic eggs.

Happy crafting!
~Macy

Linking up to:


Tip Junkie handmade projects

Tuesday, March 20, 2012

5 Minute Project: Upcycled Art Drying Station

I love upcycling and I have had these toddler bed rails sitting in my closet just begging to be used. The idea came to me this morning while I was trying to figure out how to dry the kiddles' art projects without dripping paint everywhere. This is what I came up with!


Materials:
paper box lid
toddler bed rails or step ladder pieces
twine, ribbon, or yarn
clothes pins
hot glue

Place bed rails into the box and balance them against each other so they form a triangle. Tie them together. You could also glue them.


Hot glue a clothes pin near the top of each rail. This is where you can hang pictures.


I originally made this with curling ribbon, but replaced it with hemp cord.

If you want you can string ribbon inside the triangle for an extra picture hanger. This is good for hanging small papers or foam projects.


The box lid will catch any dripping paint, and works for drying wood or clay projects. We painted cans to make wind socks and placed them here to dry.


Decorate your box if desired. I painted mine with chalk board paint so I could write down the time I hung up the pictures/projects.


There you have it. A five minute project that you can use over and over!

Happy Crafting!
~Macy

Linking up to:


”LIL/