Showing posts with label kid crafts. Show all posts

Sunday, November 27, 2011

Fancy Nancy Splendiferous Tree Topper


By now you know that we in the Moon house are a bit crazy for all things Fancy Nancy. Even the boys don't mind the fancy insanity because it brings so much cheer to our home.
For her birthday, Samantha got the Fancy Nancy Splendiferous Christmas.


In the book, Nancy breaks the angel tree topper and the family has to make their own from pipe cleaners, pompoms, and a paper plate.


Who could ask for more? Fancy Nancy AND and art project all in the same book!


After reading the book, Samantha and I took a trip to the craft store and bought everything we needed to make our own.

First, paint the plate red. You could also take the easy route and use a red Solo plate.

Once the paint dries tape or glue pipe cleaners around the back of the plate. I tried glue and they wouldn't stay, so I ended up taping the pipe cleaners in place.

Next, glue the pompoms to the ends of the pipe cleaners. I used hot glue for this part.
To mount the topper, glue a party hat to the back of the plate.


I glued some tinsel to the hat for a little more "bling".


Now it is time to decorate the front. Cut out a star and glue it to the plate.
In the book Nancy uses gift bows to decorate the star. We only had one bow so we used small ornaments for the rest.
Decorate with whatever else you have on hand.


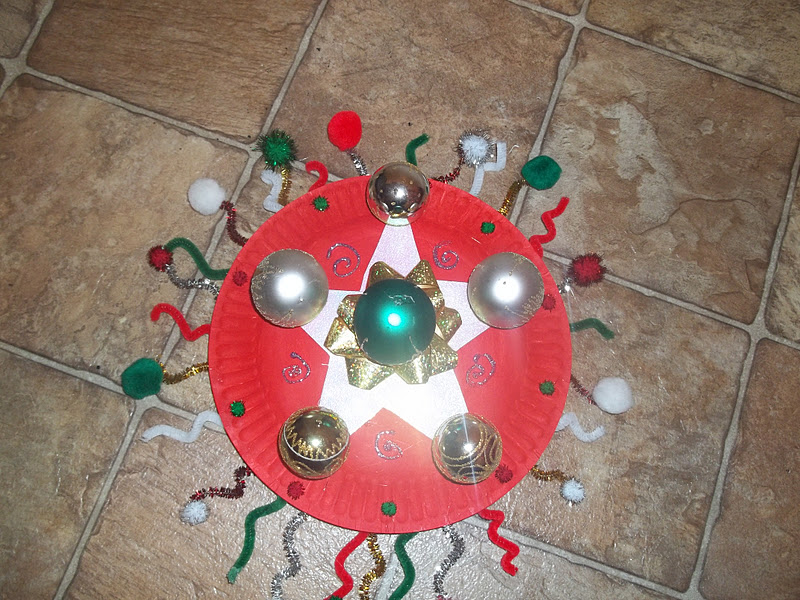
Don't forget the bow at the bottom!


This topper was so fun to make and I know it means a lot to my daughter.

Making the tree fancy.

Mommy's little helper.

Our tree is a crazy hodge podge of everything we love, with more homemade ornaments on the way.

Is there a theme to your tree this year?

Happy crafting!
~Macy

P.S. Don't overlook party and office supply stores, like Staples, for good deals.


Getting my link on with:


Making


   UndertheTableandDreaming

BWS tips button


Funky Junk's Sat Nite Special

Friday, November 11, 2011

Veterans Day Coloring Page

Happy Veterans Day! I would like to take a moment to thank our wonderful troops and their amazing families for their service to our country. THANK YOU!!

I wanted to print out some Veterans Day coloring pages for the kiddles, but I couldn't find any that thanked the troops AND said Happy Veterans Day. I found a really cute heart-shaped flag HERE, and just added my own wording.

Click HERE to download

We colored these pages last year, but I could not for the life of me find them this year.


Happy Veterans Day!

~Macy

Friday, June 10, 2011

Cars 2 Mod Podge Charms


Cars 2 comes out on June 24th and I have 2 very excited kiddles. We found Cars 2 cereal at Target the other day and even though it is just Cheerios with red food coloring my son wanted to eat it for every meal. I was about to throw the box in the recycling pile when I realized that it was covered with the Cars 2 logo. Out came the scissors and the Mod Podge and within a few minutes I had made fun little Cars charms for my 2 oldest munchkins. Here is how easy it is to make them:

Materials needed:
Cars 2 cereal--found at Target
Mod Podge
Craft foam (optional)
necklace bails (optional)

Photo courtesy of Kellogs


Cut out the Cars 2 logos from the cereal box and glue them to a piece of craft foam if desired.

Using an Exacto knife cut around the logo so the foam isn't showing.


Brush Mod Podge over the logo and let it dry. Apply a second coat and let that dry.
Poke a hole through the top of the charm and insert a bail if you have one.

I let the kids bead a strand of hemp and put the charm in the middle.


Voila! A cool necklace that the kids can wear to the movies.


Confessions of a Stay at Home Mommy

Feeding my link party addiction with:


Photobucket

Tuesday, May 31, 2011

Kiddle Craft: Homemade Pinwheels


Pinwheels are a staple of childhood. We all had them and our kids still love them, so here are some easy instructions to make your own. The best part is you can customize them to fit your little munchkin.

Materials needed:
1 skewer
1 toothpick
1 rubber band
2 squares of scrapbook paper
4 beads--I used 2 pony beads and 2 foam beads

To make the wheel:
Step 1: Cut out 2 squares of paper. I used 6 inch squares.
Step 2: Glue the squares together so both sides are decorative.
Step 3: Cut a straight line at each corner toward the middle of the square. Leave 3/4 of an inch at the middle.

Step 4: Cover the uncut center with glue and fold one half of each corner toward the middle. Press and hold or secure with a clothes pin.

Once the glue is dry you can make a clean hole through the middle by using a pushpin.

To make the stem:
Step 1: Hold the skewer vertically and cross a toothpick near the top horizontally so it looks like a cross.

Step 2: Weaver a rubber band around your toothpick and skewer to secure them in place.


To join your 2 pieces thread 2 pony beads onto the long end of the toothpick and slide your pinwheel onto the toothpick.

I slid 2 foam beads on after the wheel to secure it in place. If you think of a better way to secure it please leave a comment!


Voila! There you have a pinwheel. Make sure to supervise young children since the toothpick can be dangerous. Cut the back of the point off the toothpick and duct tape the edge so it isn't sharp.

Have fun and happy crafting!

Confessions of a Stay at Home Mommy