Showing posts with label unique. Show all posts

Friday, December 2, 2011

Bobbin Bling


While browsing Etsy today I came across some really cute vintage spools with cotton thread as necklaces. It is such a great idea and so beautiful in its simplicity. I recently bought a lot of vintage spools, but they were bare. Instead of wrapping one in thread, I decided to wrap it with gold wire.


Once I finished the first one, I decided I needed a little more crafty bling in my jewelry box.

The fancy vignette is really to hide the dog hair on my shirt.

Ooh Shiny!

These would make great Christmas gifts, but I am keeping them for myself. Muahahaha! Ok, in reality I will probably head over to Michaels and replenish my wire supply to make a few as gifts and post some in my Etsy shop. I'm thinking purple wire next.

Linking up to:

BWS tips button

Link Party


Funky Junk's Sat Nite Special


Thursday, August 11, 2011

Paint Brush and Glue Stick Sunburst Mirror


My sunburst mirror wall is complete. My once lonely skewer sunburst mirror now has a friend on each side. :)


A few weeks ago I added a crayon sunburst mirror and today I completed the set with a mirror that is a tribute to my crafting obsession.

Materials needed:
5 inch round mirror
hot glue sticks
paint brushes
acrylic paint (optional)
empty ribbon spool
hot glue gun

Evenly space and glue paint brushes around your mirror. I did 8 paint brushes.
To add more color you can dip your brushes in paint.
Glue hot glue sticks in between the paint brushes.
Place an empty ribbon spool in the center of the back of the mirror. This makes in easy to hang on the wall.


Once the glue and paint on the mirror dry you can mount it to the wall. Because the hole is in the center of the ribbon spool you may have to put a wall mounting strip or a piece of duct tape at the top of the spool to keep the mirror from tilting down.

Happy Crafting!


~Macy

Gettin' my link on with:

 UndertheTableandDreaming


The Shabby Nest


Photobucket


http://chiconashoestringdecorating.blogspot.com/


Transformation Thursday


Somewhat Simple

HookingupwithHoH

Rhinestone Beagle

Wednesday, April 13, 2011

Unique Duct Tape Wreath


Duct tape fixes everything...including boredom! I had fun making this wreath because it was easy to do while sitting on the floor watching Lost. Are you beginning to see a pattern here?

Materials needed:
Wreath form--I highly recommend a Styrofoam form
Duct tape in desired colors
Toothpick or skewer
rubber cement or super glue
spare washers, bolts and screws

To make a duct tape rose:
Tear tape into strips--

Fold the right corner over, stopping short of the left edge


Fold the left corner over to meet the right

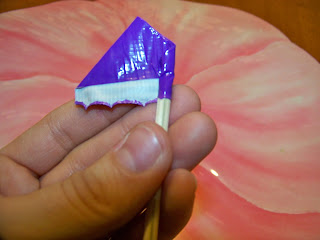
Wrap your petal around a skewer or toothpick

This is what your first petal will look like

Continue wrapping petals around each other

Add petals until you reach the desired fullness

A rose that never needs watering

To make the wreath:
Wrap duct tape around your form until it is covered, leaving a small area open to insert your flower.


Tape the remaining area and secure the rose with a few narrow strips of tape.
 I hung some washers from the bottom of my rose by twisting strips of tape and wrapping them around the washers. I did this with 5 washers of different sizes and secured the bunch to the bottom of the rose with a narrow strip of tape.


Secure nuts, bolts and any other desired embellishments with rubber cement or super glue. I tried hot gluing the first time and they didn't stay on for long.


Here is an example of a wreath made with
colored duct tape


Enjoy your wreath! This makes a fun decoration for a garage or workshop.


UndertheTableandDreaming


BWS tips button